30 October 2015

Front Sway Bar Service

Replacing the wearable parts on the front sway bar is simple.  A thin 16mm open end wrench makes it easy to counterhold the self locking nuts.

Front sway bar mounting bushings, 31351135805, $21.23r each
Front sway bar stabilizer arms, Lemforder from FCP Euro, 31352227203, $29.77r each
Front sway bar stabilizer arm nuts, 07129964672, need 4, $1.03r each

Total cost of this mod = $106.12
Total investment in vehicle = $1,114.92


You will need a very thin wrench like this one 

The Lemforders look exactly like what came off the car.


TIS says tighten these to 21 Nm in "normal position" which I take to mean weight on wheels

New on top, old on bottom


The Last Word in Floormats

This car actually came with 2 sets of floor mats.  One set was very well used, one set was in okay shape.  For many years, I was a stickler for only Original BMW floor mats.  When we bought my wife's E86 M Coupe, Dwayne Mosley had installed Cocomats.  I was sold on them.  They are thicker and more durable than any "cloth" floor mat I have ever seen.  Plus, they are made to order and made in South Carolina.  I run them in my S54... they were able to match my Walnut interior.  Cocomats (the original ones) have been a BMW favorite for years.  For this car, I chose black with gray dots.

Total price of this mod = $179.00 
Total investment in vehicle to date = $1,008.80


29 October 2015

TBT: Press Photos from Inside the Spartanburg Factory

Note the rear fog lights appear to be on in this photo


Engine / Motor Mounts

Replaced the motor mounts.  Went with Lemforder motor mounts and saved significantly over BMW-boxed ones.  The basic procedure I used is here.  But, I wasn't able to get the right hand side (passenger) motor mount off of the car, even with the engine raised as high as possible.  In fact, when I had the jack and 2x4 under the oil pan, the car just barely started to come off the front right jackstand.  This is a dangerous mod.  When you jack the engine, the throttle cable will be stressed and you should un-couple it before you start jacking.  And the fan blades will come into contact witht he fan shroud, so be mindful of that.  To get the right hand mount off, I removed the motor mount bracket.  Four 13 mm bolts and a ground strap.  This was the only way I could come up with and it worked fine.  When I got the old mounts off the car, they didn't look terrible, but they are 16 year old rubber under high heat cycles and this mod is only about $110 total.

Also, the car came with a Strong-Strut Butt Strut which I do not care for, so I took it off and restored the car to its factory condition.  The replacement -136 nuts are oval shaped and one-use-only.  I torqued them to 140 Nm per TIS, but I am thinking that is too high.  Discussed it with Randy Forbes and he uses 110 Nm.  The studs are 127 Nm, so it seems like the nuts should be less, like Randy's 110 Nm.  I would stick to 110 Nm if I did this again.  Also spotted unusual corrosion on the rear shock bolts, so I replaced them with new OEM bolts from BMW and I used new stainless steel washers. 


Motor Mounts, Lemforder from FCP Euro, 11812283798, $51.99r each
Motor Mount Self Locking Nut, 22116779973, need 4, $1.58r each
Nuts to Delete Butt Strut tow hook, 33331126136, $2.61r each, need 2
Bolts for bottom of rear shocks, 07119900402, $4.27r each, need 2 

Total price of this mod = $124.06
Total investment in vehicle to date = $829.80


Original on the left, new on the right.
Corrosion
New


25 October 2015

Rear Hatch Repairs: Lock and Wiper Washer Dribble

The early M coupes had issues with the rear hatch.  The first was the rods that connected the hatch key assembly to the motor actuator would come un-clipped and/or the center plastic fitting would crack.  The second was the rear wiper washer nozzle would dribble fluid under high speed corners.  These eventually both got addressed in production and on customer complaint basis.

The fixes to these issues were to add speed nuts to the hatch rods and to add a check valve to the wiper washer line.  I naively assumed that every coupe on the planet already had these fixes.  Not this one!  So I completed the fix myself.

Rear wiper hose, 61661357388, $5.90r
Rear wiper check valve, 61688391402, $4.87r
2 hose clamps for check valve, auto parts store du jour, $TBD
Speed nut, need 2, 51247065559, $0.34r each

Total cost of these mods = $11.45r
Total investment in vehicle to date = $705.74

You do not actually need the meter of hose shown on left, but BMW prescribed it in the original recall/warranty fix.
Remove qty 3 T30 Torx screws and let the latch mechanism be free in order to get better access.
You can see the added speed nuts if you look very closely. 
You can see the speed nuts installed on the rod ends here.  Use a small socket to press them into place.
Washer check valve shown here.  One hose clamp is shown, but the other was added after the picture.  The barbs on the check valve are so substantial, I suspect you could skip the clamps altogether.


Public Service Announcement: License Plate Light Bulbs

When I was detailing the car, I pulled the complete license plate assembly off the hatch.  To my surprise I found that both of the license plate bulb assemblies had cracked on both sides of the bulb.  The plastic looked like it had been heat cycled and cooked.

I pulled the assemblies off the S54 and found no cracks, but they were starting to brown a little in the same locations.

The stock bulbs are 5 watt type 194s.  I fixed the cracks with epoxy and I am replacing the bulbs with lower-wattage 3.35 watt 194s I found on Amazon.  The other route to go here would be replace the bulbs with LED, either complete assemblies from BMW or with LED bulbs.  They certainly will generate less heat.  But, I like to keep the car period-correct so I am using incandescent.  As always, feel free to do it your way.

Type 194 bulbs, 3.35 watts each, 10 pack $9.99r

Total price of this mod = $2.00r
Total investment in vehicle to date = $694.29

Cracked.
Cracked.


Fixed with epoxy and 3.3 watt 194 bulbs?  Let's hope so.

S54 at about 30k miles showing early signs of burns


22 October 2015

TBT: Original LeatherZ Commercials

Back in 2000 or 2001, I made this "advertisement" for LeatherZ.  At the time, I don't even think Youtube existed.  I had the idea that customers would be more likely to buy products from us if they came with videos that showed how to install them.  So I shot videos of myself installing everything we sell and narrating the instructions with voice over.  We used to give away CD-ROMs (yeah, not DVD, not memory stick) with all the installation instructions on them.  This video was meant just to be fun and make the company look good.  I still like it, years later.


This second ad was for the "Technical Installation Disc" mentioned above and it's fun too.


21 October 2015

Removing Airbag Warning Labels on Visors

On my S54, I bought European visors to get rid of the airbag labels.  In Europe, the visors are just plain black.  Beautiful, but expensive.  In the spirit of this particular car however, I wanted to try the usual DIY with Goof Off.  It works ok.  Not perfect but much better than stock.  I followed Vinci's post here.  It took only a few minutes to get most of the labels off, but I probably spent 10 minutes per visor (read: a lot of time) with a tooth brush and more Goof Off to get them really clean.  I finished them with Aerospace 303 vinyl protectant.  Pics below.

Total price of this mod = $0.00 
Total investment in vehicle to date = $692.29


After first pass, but still "chalky".  10 minutes each with a tooth brush and more Goof Off to be finished.

Treated with Aerospace 303 vinyl protectant


20 October 2015

Trivia Tuesday: OEM Style 40 Wheels

The original Hypersilver wheels were part numbers:
36112228050 (front)
36112228060 (rear)

And the 2001-2002 Chrome Shadow versions were:
36112282050 (front)
36112282060 (rear)

Both sets of wheels were cast with part markings matching the Hypersilver wheel part numbers.  To add to the confusion, they have eerily similar part numbers, too.

The question of the day is: what are the 2 ways (yes, there are 2) to tell them apart?  How do you know if you have Hypersilver or Chrome Shadow?


10/21/2015 UPDATE WITH ANSWER:
The most obvious way to tell if Style 40 wheels are Chrome Shadow (2001-2002) or Hypersilver (1999-2000) finish is to look at the inner barrels.  They are black on Chrome Shadow wheels (the base color) and gray on Hypersilver wheels (their base color).

But, the second way to tell is that Chrome Shadow wheels actually have a small decal inside the center bore that says "CHROME SHADOW".  It is usually covered by the Roundel center cap.  Here are some poor quality camera phone pictures of the wheels that came off my S52, apparently all 4 were Chrome Shadow.  They did not match well (at all) front to back, so I was expecting to find Hyper Silver in the rear and Chrome Shadow in the front.  But I think the variation in Chrome Shadow can be and is pretty significant.  I am having all 4 wheels refinished and getting new tires, and will write a separate post on that when I get them back.


19 October 2015

Clutch Pedal Bushing Service

While I had the seats out to help with removing the headliner, I took the opportunity to replace the clutch pedal bushings with delrin units from Rogue Engineering.  When I did this 13 or 14 years ago on my S54, it was a horrendous job.  Much easier the second time, even after all these years.  It also might be slightly easier on the S52 as I remember having to remove a large power distribution box on the S54 that wasn't there for the S52.  The sequence is everything.  And, do not stress or disturb the clutch master cylinder assembly.  You can actually create squeaks if you do.  The trick is remove only one of the 2 10mm bolts securing the master cylinder (see second image below, part number 6, annotated with a red "5" for sequence, the other bolt is not shown), and leave the other in place.  I annotated some TIS drawings of the sequence I used for removal.  Follow the steps in numerical order for disassembly, clean and use Superlube on everything and re-install in exact opposite sequence.

Rogue Engineering clutch pedal bushings = $20.00r
Total price of this mod = $20.00 
Total investment in vehicle to date = $692.29


The clutch pedal squeaked in this car, and was obviously crooked.


Stock split bushings on top, Rogue delrin on bottom

Use Superlube at all mating and sliding surfaces, everywhere.

Warning Triangle and Easter Eggs

The M coupe did not come with any "Easter egg" surprises really.  Unless you count "hey, the windows don't go all the way down" or "No, for the 8th time, it's not an M3, it's an M coupe" or "why doesn't the sunroof switch light up?".  The car is basic and purposeful without any frilly treats.  I'm fine with that, and I suspect you are too.

But, when you buy a used one, you might just find an Easter egg or two like I did.  You might find a few unwelcome surprises as well...  One of the unwelcome ones was finding that the battery did not have the proper vent tube installed.  It was just gone.  I replaced it with new parts from BMW, readily available and easily installed.  In the process of having the rear hatch pieces out, I discovered the 2 surprise Easter eggs on this particular car: a new, never-used blue box OEM BMW warning triangle, and the right hand side tool kit holder.  This car was run in Germany for a few years, so there is a chance the warning triangle was required to be there in order to operate in Germany.  LeatherZ sold many triangles over the years.  We used to trade our parts for Euro-only parts like triangles and first aid kits with an enthusiast in Sweden.  There is a chance on the of the previous owners bought the triangle from us, I suppose.

BMW USA did / does sell warning triangles, but they are not the exact part number spec'd for the M coupe.  They are generic ones.  The trick is, the correct warning triangle is only reflective on one side.  Therefore, if you are a jackass, and BMW or the US DOT evidently thinks US drivers are, you might put the warning triangle facing the wrong way in an emergency and it will not be effective.  The Europeans apparently, let the driver assume the responsibility of some actual thought.  The generic BMW triangle is reflective on both sides so theoretically it is impossible to set up wrong.

The tool kit plate, while unfortunately missing the Z3 jack and lug wrench, was not stock on the M coupe.  Normally there would be a plate that would allow you to store the owner's manual in that location.  I had planned on upgrading the tool kit plate anyway, so both were a nice surprise.  When I bought the car, I was so focused on looking for rear subframe damage, I didn't even notice the tool kit plate!

I do not have an original European first aid kit for this car yet.  But I do like to carry first aid kits.  I bought one similar to the European unit from Amazon for about $17 and I am using that until I can find an original.  The Amazon kit is similar and size and fits into the proper location.


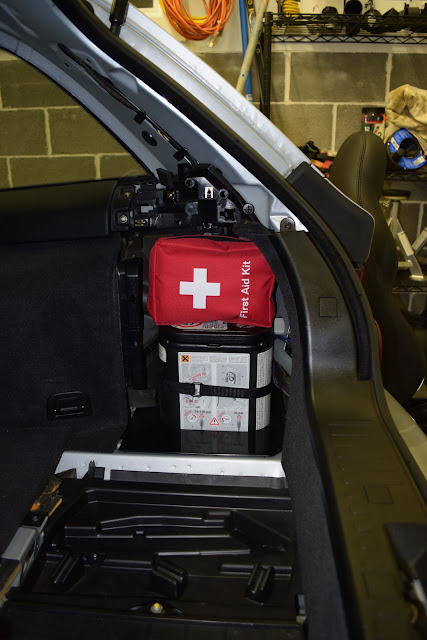
Aftermarket first aid kit installed in factory location

Clear Film Underhood Protection Pieces

One of the more sad parts in my engine bay is the clear film that protects the paint from the hood mechanism bumpers.  It is discolored and cracked and completely shot.  I have some 3M clear paint film in stock, so I decided to make my own replacements.  I could not find an original BMW part number for this film, although I did find the P/N for the clear, round paint film used at the hood and hatch bumpers.  I traced the OEM design with tracing paper, removed the old film with a lot of patience and a hair dryer, and applied the new film.  Looks (and works) way better than the 16-year-old film.

3M Clear Film = scraps in stock
Total price of this mod = $0.00
Total investment in vehicle to date = $672.29


Sad clear film


Template making from tracing paper

Template

Film removed with hair dryer, plastic scraper, 3M adhesive remover, and lots of patience

New film installed